In order to make sure that the haniwa (here is another interesting article about haniwa) were completely dry, they sat exposed to the air and sunlight for 2 weeks. Since the smaller haniwa dry more quickly, I was able to fire the octopus, robot, and a few other smaller pieces prior to the bigger pieces.
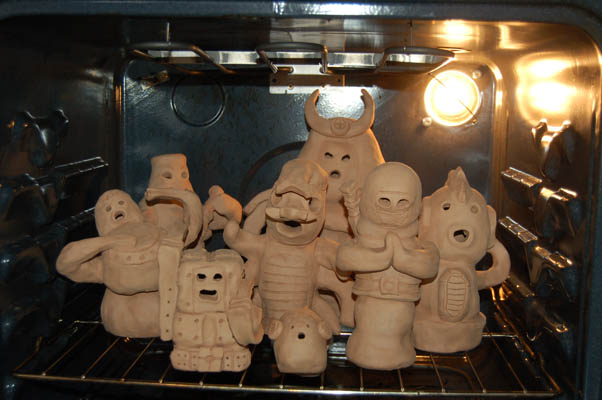
This is the first group of haniwa. From right to left the group consists of a kabutomushi (rhinocerous beetle), a fugu (puffer fish), a bucket-headed sanshin player (made out of a gourd and bamboo stock), a ninja, a soldier with butterfly swords, a Taiko spirit, a Freeza-like spirit, and a Satsuma (not this Satsuma) samurai.
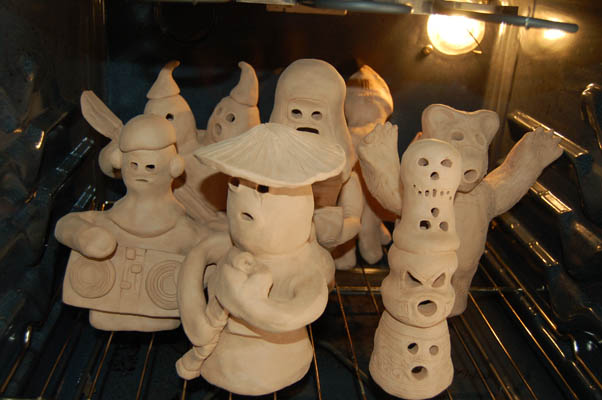
The second group is made up of a DJ, my version of a Daruma totem (a dual skull on top of a stormtrooper on top of a ninja turtle wind god), a snowtrooper (based on the kind that raided Hoth at the beginning of The Empire Strikes Back), a two-headed warrior wielding a naginata, a bear, the squid Pope, and a ronin bearing a cane sword.

I fired the first group last week, and unfortunately, a few of them cracked. The samurai lost a piece of his helmet, the Taiko spirit lost part of his back, and the Fugu was badly damaged. I was able to fix them all with some super glue and used Gorilla Glue to fill in places where the fugu was badly damaged.

I just finished firing this group, and they all look like they survived the process intact. I guess it just took a little bit of time to refine my technique.
The clay I used was special in that it is made to be fired at 350 degrees for 1 hour, so I was able to do this in a household oven. I plan to make more as soon as I get more clay, but I need to find someone with a kiln so I can get those fired as well.
So far, the project is off to a good start.

|
You are using an insecure version of your web browser. Please update your browser!
Using an outdated browser makes your computer unsafe. For a safer, faster, more enjoyable user experience, please update your browser today or try a newer browser.
|

7 Responses to Haniwa: Curing and Firing